
Sharp loppers make pruning faster, cleaner, and far less tiring. If you are wondering how to sharpen garden loppers, the good news is that the job is simple once you know which edge to work on and how much metal to remove.
A dull lopper crushes stems instead of slicing them. That leads to ragged cuts, more plant stress, and extra work for your hands and arms. With the right file, a little cleaning, and a few careful passes, most loppers can cut like new again.
This guide shows you exactly how to do it safely, how to tell when the blade is truly dull, and how to keep the tool sharper for longer. You will also learn the common mistakes that ruin loppers, so you do not waste time or damage the cutting edge.
Check the lopper first, not the file
Before you sharpen anything, identify the type of lopper you own. Most garden loppers are bypass loppers, which work like scissors. One curved blade passes by a hooked counter blade. Some are anvil loppers, where one sharp blade closes onto a flat surface. The sharpening approach is similar, but the care you need is different.
For bypass loppers, only the cutting blade needs sharpening. The counter blade usually just needs cleaning and a light touch-up on the flat side if it has burrs. For anvil loppers, the blade edge is the main focus, but the flat anvil surface should stay smooth and free of nicks.
The first clue that sharpening is needed is not always visible wear. A lopper can look fine and still cut poorly. If it starts to snag, crush, or require two hands to close on stems smaller than about 1/2 inch to 3/4 inch, the edge is probably dull, dirty, or both.
Signs your loppers need sharpening
- The cut feels rough instead of smooth.
- Branches slip out before they are fully cut.
- You need extra force to close the handles.
- Fresh cuts look torn, flattened, or split.
- The blade leaves shiny crush marks on stems.
One non-obvious clue: sap buildup can mimic a dull blade. Sticky residue adds friction, so the tool feels weaker even if the edge is still decent. Cleaning alone may improve performance a lot, especially after cutting resin-heavy plants like juniper or pine.
Gather the right tools before you start
You do not need a shop full of equipment. A simple, safe setup is enough for most home gardeners. The goal is controlled metal removal, not aggressive grinding. Taking off too much steel shortens the life of the blade and changes its cutting angle.
For most loppers, these tools are enough:
- A flat or half-round mill file or a fine sharpening file
- Medium and fine-grit sandpaper or a sharpening stone
- A stiff brush or old toothbrush
- Rubbing alcohol, mineral spirits, or soapy water for cleaning
- A clean rag or paper towels
- Work gloves
- Safety glasses
If the blade is heavily rusted, a little rust remover or steel wool can help before sharpening. If the pivot is loose, a wrench or screwdriver may be useful too. A sloppy pivot can make even a sharp blade feel weak.
One useful safety reminder: clamp the lopper in a vise or hold it very steady while sharpening. A moving blade is hard to control and more likely to slip. The CPSC’s general hand tool safety guidance is a good reference for safe tool handling and eye protection: official tool safety guidance.
Clean the blades before you sharpen
Cleaning is not optional. Dirt, sap, and rust hide the real edge and can clog the file. If you sharpen over grime, you often end up polishing dirt into the blade instead of restoring the cut.
Start by opening the lopper fully. Wipe off loose debris with a rag. Then use a brush and cleaner to remove sap and sticky residue. If needed, scrub the blade with a little mineral spirits or alcohol and wipe it dry right away.
Pay attention to the pivot area and the inside curve of the blade. These spots trap grime fast. A clean pivot also helps the tool open and close with less drag. That matters more than many people think, because a stiff pivot can make a sharp blade feel dull.
Remove rust the smart way
Light rust can usually be removed with fine steel wool or a medium-grit abrasive pad. Heavy rust may need more work, but do not scrape aggressively. You want to clear the rust, not gouge the steel.
If you find deep pitting, sharpen just enough to restore a working edge. Deep rust damage often leaves a rough blade even after cleaning. In that case, the tool may still work well for garden use, but it will need more frequent maintenance.
How to sharpen garden loppers the right way
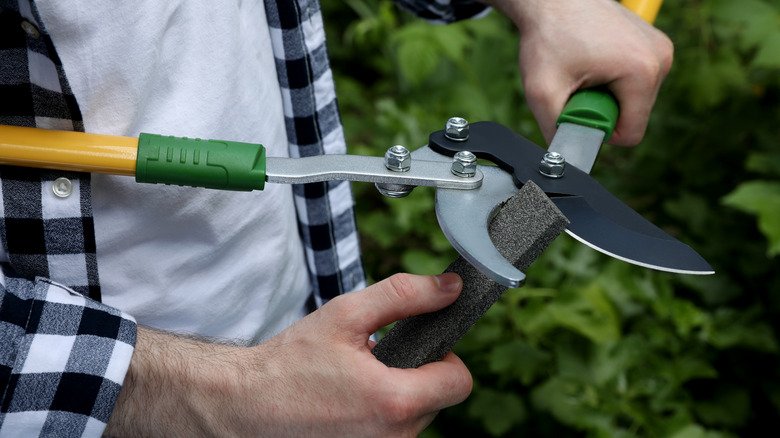
This is the core part. The main rule is simple: follow the original bevel. The bevel is the angled face on the cutting edge. If you match that angle, the blade cuts cleanly without becoming too thin or weak.
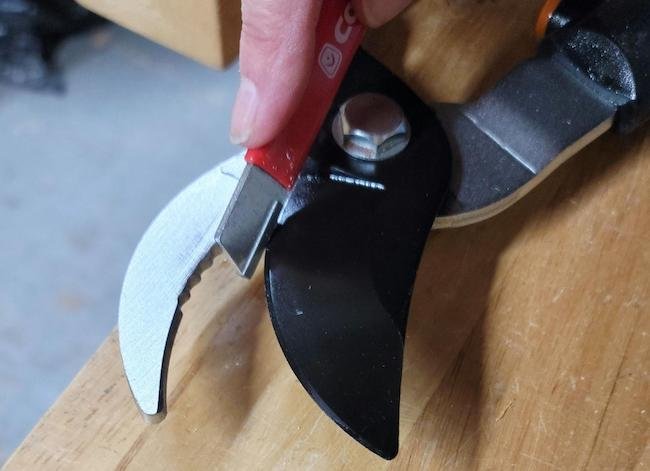
For bypass loppers, place the sharpened side of the cutting blade toward you. File only the beveled edge, and work from the base of the bevel toward the tip. Use smooth strokes in one direction. Most of the time, 5 to 10 light passes are enough for routine maintenance.
Do not saw back and forth with the file. That wastes energy and creates an uneven edge. Instead, lift the file on the return stroke. You want controlled, consistent contact, not heavy pressure.
Credit: housedigest.com
Step-by-step sharpening process
- Secure the loppers so the blade does not move.
- Inspect the cutting edge under good light.
- Find the beveled side of the blade.
- File in one direction, matching the existing angle.
- Use light pressure and even strokes.
- Stop when the edge looks clean and consistent.
- Remove any burr from the flat side with one or two very light passes.
- Wipe the blade clean and test the cut.
A burr is a tiny curl of metal that forms on the opposite side of the edge. A small burr is normal, but a large one means you pressed too hard or used the wrong angle. Remove it gently, or it can interfere with cutting.
What to do with anvil loppers
Anvil loppers are different because the blade cuts against a flat surface. Sharpen the angled edge of the blade as usual, but keep the anvil face flat, smooth, and clean. If the anvil has nicks or rough spots, smooth them lightly so the blade does not catch.
Do not try to create a razor-thin edge on an anvil lopper. These tools are built more for crushing than scissor-like slicing. A decent edge is enough. The real goal is a clean release from the anvil surface, not a delicate knife edge.
How much metal should you remove?
Less than most people think. For normal home use, you are usually just restoring the edge, not reshaping the blade. If you can see bright fresh metal across the bevel after a few passes, that is enough. Over-sharpening can shorten blade life and make the edge chip faster.
Here is a useful rule: if the blade has only mild dullness, stop early. If it has small nicks, file only until the nicks disappear. If the edge is badly damaged or bent, sharpening alone may not fully fix it.
| Blade condition | Best approach | Expected result |
|---|---|---|
| Light dullness | 5 to 10 light file strokes | Cleaner, smoother cuts |
| Sap buildup and grime | Clean first, then sharpen lightly | Noticeable improvement without much filing |
| Small nicks | File until the edge is even | Restored cutting performance |
| Deep rust or major damage | Clean, file carefully, then inspect again | May improve, but not always fully restored |
Test the edge and adjust before you put the tool away
After sharpening, test the loppers on a small branch or a tough plant stem. A good blade should cut with less squeeze and leave a cleaner surface. The cut should look fairly smooth, not crushed or torn.
If the blade still feels sticky, check three things. First, look for leftover sap. Second, see whether the pivot is too tight. Third, check if the bevel angle matches the original edge. Many sharpening problems are really alignment problems.
A common mistake is testing only on soft green stems. Soft material hides poor sharpness. Try a slightly woody stem in the tool’s normal cutting range, around 1/4 inch to 1/2 inch for many home loppers, to get a better read on performance.
Credit: sublimegardens.co.uk
Adjust the pivot if needed
If the pivot is too loose, the blade may wobble and miss the cut line. If it is too tight, the handles may bind. Adjust it just enough so the blade moves smoothly without side-to-side play. This small step often makes a bigger difference than one more round of filing.
Also check the spring, locking mechanism, and grips if your loppers have them. A sharp blade cannot fully compensate for a damaged handle or misaligned pivot. Good cutting starts with the whole tool working together.
Keep the edge sharp for longer
Sharpening is only half the job. Good care keeps the edge useful for months, not days. The easiest habit is cleaning the blades after each pruning session. A quick wipe removes sap before it hardens.
Store loppers dry, not in a damp shed corner. Moisture causes rust, and rust is one of the fastest ways to ruin a good edge. If you prune resin-heavy or wet plants, clean the blade right away instead of waiting until the next day.
Lubricate the pivot lightly after cleaning. A drop of oil reduces friction and protects against rust. Do not over-oil the blade itself, especially if you are cutting near soil or dusty debris. Too much oil can attract grit.
Simple habits that extend blade life
- Wipe blades after every use.
- Sharpen before the blade is badly dull.
- Keep the tool dry during storage.
- Oil the pivot, not the whole cutting edge.
- Use the right lopper for the branch size.
One detail many gardeners miss: cutting branches that are too thick for the tool damages the edge faster than normal wear. If the lopper is rated for 3/4-inch branches, do not treat it like a saw. Forcing oversized cuts bends the blade and dulls it quickly.
Common mistakes that ruin loppers
The biggest mistake is using a coarse grinder when a file would do. Power grinders remove metal fast, but they also create heat. Heat can soften the blade edge if you are not careful. For most garden loppers, a hand file is safer and more controlled.
Another mistake is sharpening both sides equally on bypass loppers. That sounds logical, but it can change the cutting geometry. The beveled side does the real work. The flat side usually only needs burr removal.
People also forget the handle and pivot. A sharp blade with a bent handle or sloppy joint still performs badly. If your loppers were dropped, check alignment before sharpening. Sometimes the problem is mechanical, not the edge.
When sharpening is not enough
If the blade has cracks, severe bending, or deep pitting along the cutting line, replacement may be the better answer. A cracked blade is a safety risk because it can fail under pressure. If the tool no longer closes cleanly after basic adjustments, do not force it.
Also consider replacing the blade if the steel has been sharpened many times and the edge has become too thin. At that point, more filing can reduce strength more than it improves performance.
How often should you sharpen garden loppers?
There is no single schedule, because use matters more than time. If you prune often, light sharpening every few weeks may be normal. For occasional home use, once or twice per season may be enough.
The better rule is to sharpen when the tool starts to force the cut. Do not wait until the edge is badly worn. Small maintenance sessions take only a few minutes and are easier on the blade than full restoration later.
If you cut a lot of dry, woody stems, inspect the edge after each session. Dry wood wears edges faster than soft green growth. That is one reason some gardeners think their loppers “suddenly” got dull, when the real cause is a tougher season of pruning.
Credit: bobvila.com
Final take on cleaner cuts and easier pruning
Learning how to sharpen garden loppers pays off quickly. The blade cuts cleaner, your hands work less, and plants heal better after pruning. Most of the job comes down to cleaning first, matching the original bevel, and removing only a little metal.
Once you get the habit, sharpening takes only a short session and saves a lot of frustration later. Keep the blades clean, check the pivot, and stop as soon as the cut feels smooth again. That simple routine will make your loppers easier to use for a long time.
FAQs
1. Can I use a sharpening stone instead of a file?
Yes, a sharpening stone can work if it matches the blade well. A file is usually easier for most garden loppers because it removes small amounts of metal in a controlled way. Use the tool that lets you follow the original bevel cleanly.
2. Should both blades on bypass loppers be sharpened?
No, usually only the cutting blade needs sharpening. The flat counter blade mostly needs cleaning and burr removal. Sharpening both sides too much can change the cut and make the tool work worse.
3. How do I know if my loppers are dull or just dirty?
Clean the blades first. If the cut improves after cleaning, sap buildup was likely the main issue. If the tool still crushes stems or needs extra force, the edge probably needs sharpening too.
4. Can I use a bench grinder on garden loppers?
You can, but it is not the best choice for most people. A grinder removes metal quickly and can overheat the blade. A hand file gives better control and is safer for routine maintenance.
5. What is the best way to store loppers after sharpening?
Wipe the blades dry, add a small amount of oil to the pivot, and store the tool in a dry place. Keeping moisture away helps prevent rust and keeps the edge ready for the next pruning job.