
Dull garden shears make clean pruning harder than it should be. If you want a simple fix, how to sharpen garden shears with a stone is one of the most reliable skills you can learn.
A sharpening stone gives you control, a smooth cutting edge, and better results than guessing with random tools. With a few minutes, the right angle, and a steady hand, you can bring tired shears back to life without overcomplicating the job.
This guide shows you exactly what to do, what to avoid, and how to check your work. You will also learn when a stone is enough, when the blade is too damaged, and how to keep the edge sharp longer after you finish.
What you need before sharpening begins
Good results start with simple prep. Garden shears often collect sap, dirt, and tiny bits of plant matter, and those leftovers can make sharpening feel harder than it is. Clean blades also let you see the actual cutting edge, which matters more than most beginners realize.
You do not need a large workshop. For most shears, a medium or fine sharpening stone is enough, plus a cloth and a little oil or water, depending on the stone type. A stable surface helps too, because the biggest mistake people make is trying to sharpen while holding the tool in the air.
Before you begin, inspect the blade closely. If you see deep chips, a bent edge, or heavy rust pitting, a stone may improve the blade but not fully restore it. In those cases, the stone is still useful, but you may need more aggressive repair later.
Tools and supplies
- Sharpening stone — medium grit for dull edges, fine grit for finishing
- Clean cloth — for wiping sap and metal dust
- Water or honing oil — use what matches your stone
- Gloves — optional, but helpful for grip and hand protection
- Small brush — useful for cleaning grooves and hinge areas
- Clamp or vise — optional, but very helpful for control
If you are not sure which stone to use, a combination stone with a coarse side and a finer side works well for most home gardeners. The finer side is where the final edge comes from. The coarser side is only for duller blades that need more work first.
Know the blade type first
Garden shears are not all sharpened the same way. Bypass shears, which have two blades that slide past each other, usually need sharpening on only one cutting blade. Anvil-style shears have one sharp blade meeting a flat metal surface, and they need a slightly different touch.
If you sharpen both sides of a bypass blade by mistake, the tool may cut less cleanly. That is a common beginner error. The factory edge is usually beveled on one side only, and your job is to follow that shape instead of creating a new one.
| Shear type | What to sharpen | Main caution |
|---|---|---|
| Bypass shears | Only the cutting blade | Do not sharpen the flat mating blade unless needed |
| Anvil shears | The single cutting blade | Check the flat anvil for wear or grooves |
| Heavy loppers | Cutting blade edge only | Keep the original bevel angle |
How to sharpen garden shears with a stone step by step
The process is simple once you understand the motion. The stone does not “force” a new edge into the blade. Instead, it removes a tiny amount of metal and reshapes the existing bevel until it becomes clean and sharp again.
Work slowly. Most shears need only 10 to 20 passes on a moderately dull blade, and more passes only if the edge is rough or neglected. Rushing usually makes the angle uneven, which can leave the blades cutting poorly even after sharpening.
1. Clean the blades well
Wipe both blades with a cloth to remove dirt and sap. If sticky buildup remains, use a little rubbing alcohol or mild soap and water, then dry the tool completely. A clean blade is easier to sharpen and safer to handle.
This step matters because grit acts like sandpaper in the wrong place. If debris stays on the blade, it can scratch the stone and hide the true edge. Clean first, sharpen second.
2. Secure the shears
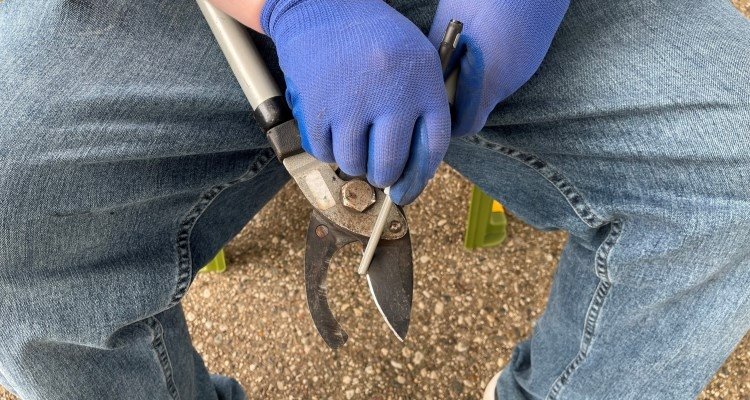
Open the shears slightly and hold them steady on a bench, or clamp them lightly if that feels safer. You want the cutting blade easy to access without wobbling. Even a small movement can change your angle and produce an uneven edge.
If you use a vise, clamp the tool gently. Too much pressure can bend smaller shears or create strain near the pivot. The goal is stability, not crushing force.
3. Find the bevel angle
Look closely at the cutting edge. Most garden shears have a visible bevel, often around 20 to 30 degrees. That angle is the guide you want to follow. If you change it too much, the blade may cut, but not cleanly.
A simple way to judge the angle is to place the stone flat against the beveled side first, then tilt it slightly until it matches the slope. Once you find that position, keep it steady. Consistency matters more than perfection.
4. Lubricate the stone if needed
Some stones need water, while others need honing oil. Check the stone type before starting. Using the wrong lubricant can reduce cutting action or clog the surface. If the stone starts to load up with metal particles, wipe it clean and add more lubricant as needed.
Do not soak oil stones in water. Do not use thick oils unless the product says to. A light, even film is enough for most work.
5. Sharpen with smooth strokes
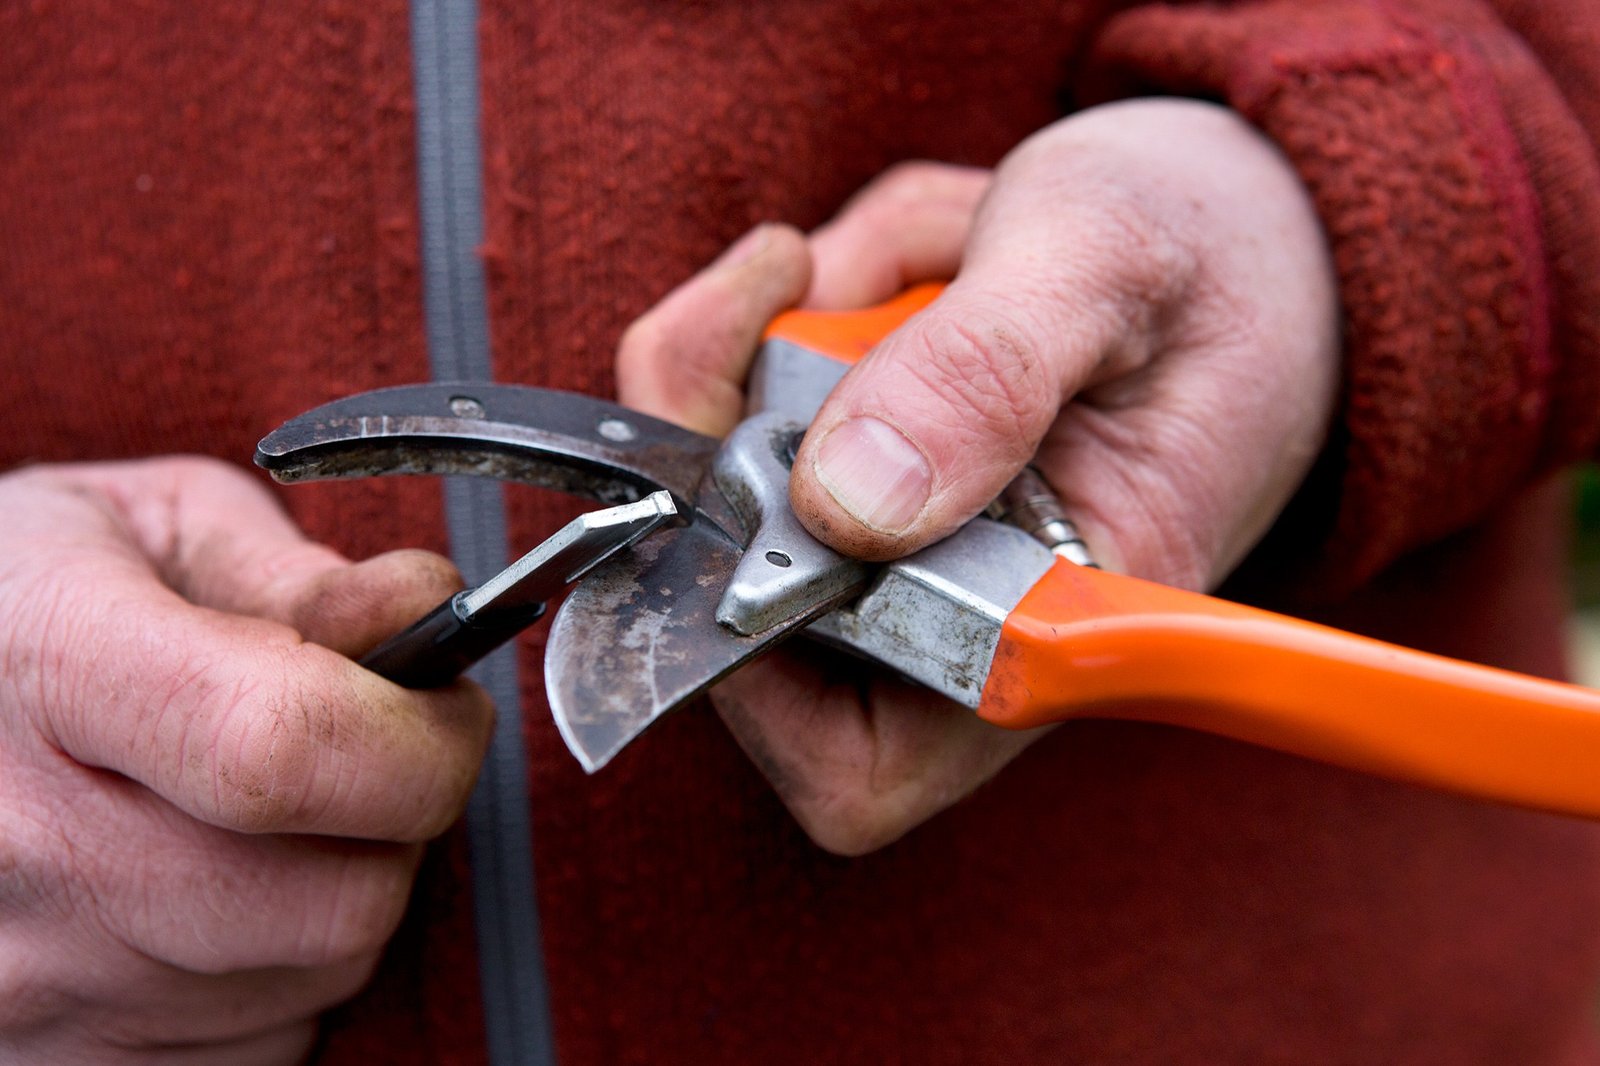
Place the stone on the beveled side of the blade and push it along the edge using smooth, controlled strokes. Move in the same direction as the bevel, usually from the inner edge toward the tip. Keep the pressure light to moderate. Let the stone do the work.
Work from the base of the blade to the tip in overlapping sections if the blade is long. On smaller garden shears, the full edge may only need a few passes. You should feel the stone removing a small amount of metal, but never force it.
Most people push too hard. That creates a jagged edge and can wear the stone unevenly. A lighter touch often gives a better final edge than strong pressure.
6. Watch for the burr
As the edge sharpens, you may feel a tiny rough ridge on the opposite side of the blade. That is called a burr. It means the stone has reached the edge and worked it over. A small burr is normal and useful. A large burr usually means too much pressure.
Once you feel a light burr along most of the edge, stop on that side. Do not keep grinding endlessly. The goal is to refine the edge, not remove extra metal.
7. Remove the burr and finish the edge
Turn the blade slightly and make 1 to 3 very light passes on the flat side, just enough to remove the burr. If your shears have a flat back on the cutting blade, keep that side nearly flat against the stone. You are not trying to create a second bevel.
Then return to the beveled side and make a few lighter finishing strokes. This step helps smooth the edge. A refined edge cuts cleaner and is less likely to crush stems.
8. Test the cut
Cut a small piece of paper, thin cardboard, or a soft green stem. The blade should slice cleanly with little resistance. If it snags, repeat a few light sharpening strokes and test again. Do not keep grinding if the problem is actually dirt, a loose pivot, or blade misalignment.
Some gardeners test with a twig, but that can hide problems. Green stems show the real result better because they reveal whether the edge is clean or just “kind of sharp.”
What a good edge looks and feels like
A sharp pair of shears should cut without crushing. The cut should feel smooth, and the blade should pass through the stem with little effort. If you hear a scraping sound or see torn plant tissue, the edge still needs work.
Non-obvious detail: a blade can feel sharp to your finger and still cut badly if the two blades are not aligned. The pivot tension matters almost as much as the edge itself. If the blades cross too loosely, they can miss each other. If they are too tight, cutting becomes stiff and tiring.
Another useful clue is the shine on the bevel. A consistent, narrow shiny line often means the stone reached the true edge. Wide shiny patches can mean the bevel is uneven or the angle changed during sharpening.
Credit: gardenersworld.com
How sharp is sharp enough?
For garden work, you do not need a razor edge. You need a clean, controlled edge that slices stems without tearing. Too sharp is rarely a problem. Too thin and fragile is more common, especially if you sharpen with aggressive pressure.
For most home pruning tasks, a well-finished edge on a medium or fine stone is enough. That balance gives good cutting performance and better durability than a blade honed to an ultra-thin edge.
Common mistakes that make shears cut worse
Many sharpening problems come from small errors, not bad tools. The most common mistake is changing the original angle. Even a few degrees off can leave the blade cutting poorly or wearing out faster.
Another mistake is sharpening both sides of a blade that was designed to be sharpened on one side only. That can reduce the shears’ natural scissor action. The blade may still look shiny and polished, but the cut will feel off.
People also often ignore the pivot. If the screw is loose, the blades shift during the cut. If it is too tight, the tool binds. Sharpening cannot fully fix either problem. A quick pivot adjustment can make a bigger difference than extra stone work.
- Do not use a very rough stone unless the edge is badly damaged.
- Do not press hard and fast.
- Do not skip cleaning before sharpening.
- Do not sharpen a bent blade without checking alignment.
- Do not leave metal filings and sap on the blade after finishing.
Credit: mygardenlife.com
When a stone is not enough
If the blade has deep chips, a rolled edge, or heavy corrosion, a sharpening stone may only partly help. In that case, you may need to flatten the edge first with a more aggressive abrasive, then finish on the stone. If the metal is badly pitted near the cutting line, replacement may be the smarter choice.
Safety also matters. For general tool handling and blade safety, the official CPSC tool safety guidance is a helpful reference before you work with sharp hand tools.
How to keep garden shears sharp longer
Sharpening is easier when you do not let the blade get badly dull. A quick wipe after every use keeps sap from hardening on the metal. Sap can trap moisture, and moisture speeds up rust. That is why clean-up is part of maintenance, not extra work.
Oil the blades lightly after cleaning if the manufacturer allows it. A thin coat helps protect the metal and reduces friction. You do not need much. Too much oil only attracts dust.
Store the shears dry and closed if possible. Do not toss them into a damp shed with wet soil stuck on the blade. Even stainless-looking tools can rust if they stay dirty long enough.
Smart maintenance habits
- Wipe blades after each session.
- Check the pivot every few uses.
- Touch up the edge before it becomes very dull.
- Remove rust spots early with a fine abrasive or stone.
- Keep the tool dry between jobs.
One non-obvious tip: light, frequent touch-ups often remove less metal than one heavy sharpening session. That helps the shears last longer. A 2-minute touch-up every few weeks is often better than a major grind once a season.
Should you use a stone, file, or sharpening tool?
A stone gives the most control and is usually the best choice for routine sharpening. A file removes more material and is better for badly dull edges or small chips. Dedicated sharpening tools can be fast, but they can also remove too much metal if you are not careful.
If your shears are only slightly dull, a stone is the safest and cleanest option. If they are very worn, start with a file and finish with a stone. The stone is the final step that refines the edge and improves the cut.
| Tool | Best use | Main advantage | Main limitation |
|---|---|---|---|
| Stone | Routine sharpening and finishing | High control | Slower on very dull edges |
| File | Heavily worn edges | Faster metal removal | Easy to overdo |
| Dedicated sharpener | Quick touch-ups | Convenient | Less precise on some blades |
For most home gardeners, the stone is the most forgiving option. It teaches good control and gives a finish that cuts cleanly without stripping away too much blade life.
Final check before you put the shears away
Once the edge is sharp, wipe the blade clean and dry it fully. Check that the pivot screw is snug but not overly tight. Open and close the shears a few times to make sure the action feels smooth.
Then test them on a real stem. A healthy blade should slice cleanly, leave a neat cut, and require less hand force. That is the real sign that how to sharpen garden shears with a stone has been done well.
If the cut still feels rough, do not assume the stone failed. Recheck blade alignment, pivot tension, and any hidden sap near the hinge. Often the problem is a small adjustment, not more sharpening.
Credit: thecelticfarm.com
FAQs
How often should I sharpen garden shears with a stone?
Most home gardeners should sharpen them a few times per season, or whenever cutting starts to feel harder. If you prune often, a light touch-up every 2 to 4 weeks can keep the edge in better shape.
Can I sharpen rusty garden shears with a stone?
Yes, but only if the rust is light to moderate. Clean off loose rust first, then use the stone to work the edge. Deep rust pitting near the cutting line may need more repair than a stone can provide.
Should I sharpen both blades on bypass shears?
No, usually only the cutting blade needs sharpening. The other blade is often meant to stay flatter. Sharpening both sides can change how the shears close and make the cut less clean.
What grit stone is best for garden shears?
A medium grit around 1,000 to 2,000 is a strong starting point for dull blades. A finer grit around 3,000 to 6,000 helps refine the edge after the initial sharpening. Combination stones work well for most people.
Why do my shears still cut badly after sharpening?
The most common reasons are loose pivot tension, blade misalignment, or sharpening the wrong side of the blade. Check those first before assuming the edge is the problem. A sharp blade can still cut poorly if the tool is not aligned correctly.