If your mower belt is slipping, cracked, or broken, learning how to change belt on riding mower can save a service trip and get the machine cutting again fast. The job is very doable for most homeowners if you work slowly and follow the belt path exactly.
The key is not strength. It is order. You need to identify the right belt, remove the covers, release tension safely, route the new belt the correct way, and test the deck before you mow.
Below is a clear step-by-step guide with the tools you need, the mistakes that waste time, and the small checks that make the repair go smoothly on the first try.
Deck belt vs drive belt: check the right belt first
Before you change a belt on a riding mower, confirm whether the problem is the deck belt or the drive belt. A deck belt usually causes blade engagement trouble, uneven cutting, squealing, or deck vibration. A drive belt usually causes weak movement, slipping after warm-up, slow reverse, or a mower that will not move even though the engine runs. Mixing up these two belts can waste time and make the repair feel harder than it is.
If the new belt slips off, do not only tighten it. Recheck the belt routing diagram, pulley grooves, idler spring tension, belt keepers, spindle bearings, and whether the belt is riding on the flat or V side of each pulley. For related checks, see the walk-behind mower drive belt adjustment, Cub Cadet ZT1 50 belt and drive troubleshooting, and Cub Cadet ZT1 50 problems guides.
How to fix a riding mower belt replacement step by step
Use this checklist as the short version of the full belt replacement process.
- Park safely, remove the key, disconnect the spark plug wire, and let all moving parts stop.
- Find the belt diagram or take photos of the belt route before removing anything.
- Remove guards or lower the mower deck enough to reach the belt path clearly.
- Release belt tension carefully and slide the old belt off the pulleys.
- Compare the old and new belts, then route the new belt exactly through the pulley path.
- Reapply tension, reinstall guards, test blade engagement, and check that the belt tracks smoothly.
How to change a riding mower deck belt safely
Use this simple sequence when the belt is worn, broken, slipping, or routed incorrectly.
- Turn off the mower, remove the key, disconnect the spark plug wire, and wait for all parts to stop.
- Take a photo of the belt route or find the belt routing decal before removing the old belt.
- Lower or remove the deck so the pulleys, idlers, guards, and belt guides are easy to see.
- Release the idler tension and remove the old belt without bending the belt guides.
- Install the new belt around the engine pulley, spindle pulleys, and idlers exactly as shown in the diagram.
- Restore belt tension, spin the pulleys by hand, reinstall covers, and test blade engagement at low throttle.
What to check before you start
Before you remove anything, confirm that the belt is actually the problem. A riding mower can stop cutting well because of a worn belt, but it can also act up because of a bent pulley, a seized spindle, or a weak idler spring. If you only replace the belt without checking those parts, the new one may fail early.
Start with a quick visual inspection. Look for cracks, missing chunks, shiny glazed spots, frayed edges, or a belt that rides loose in the pulley groove. If the belt is snapped, the diagnosis is easy. If it is still in one piece, check whether the deck blades spin freely by hand with the engine off and key removed.
You should also note the belt type. Many riding mowers use more than one belt: a deck belt that turns the blades and a drive belt that moves the machine. They are not always the same size or route. Writing down your mower’s model number now saves confusion later.
Tools and supplies you should gather
Most belt jobs need only basic hand tools. Having everything nearby keeps the repair from turning into a stop-and-start guessing game.
- Socket set or wrench set
- Screwdriver, usually flathead and Phillips
- Pliers for spring clips or belt guides
- Work gloves
- Flashlight or shop light
- New replacement belt matched to your mower model
- Owner’s manual or belt-routing diagram
A small phone camera helps too. Take photos before removal. One photo of each pulley area can save you from routing mistakes later.
Safety steps that matter
Do not skip the safety basics. A mower deck has sharp blades, pinch points, and strong spring tension. Even with the engine off, the deck can move suddenly if you release tension the wrong way.
Park on a flat surface, set the parking brake, turn the key off, and remove the spark plug wire. If your mower has a battery disconnect, use it. Let the machine cool if you were just mowing, since belts and pulleys can get hot enough to burn your hands.
For general mower safety guidance, you can also review the official mower safety guidance from the U.S. Consumer Product Safety Commission.
How to change belt on riding mower step by step
The exact belt path varies by brand, but the process is usually the same. The belt wraps around the engine pulley, idler pulleys, deck spindles, and sometimes a transmission pulley. The main job is to release tension, remove the old belt, and install the new one without changing the routing sequence.
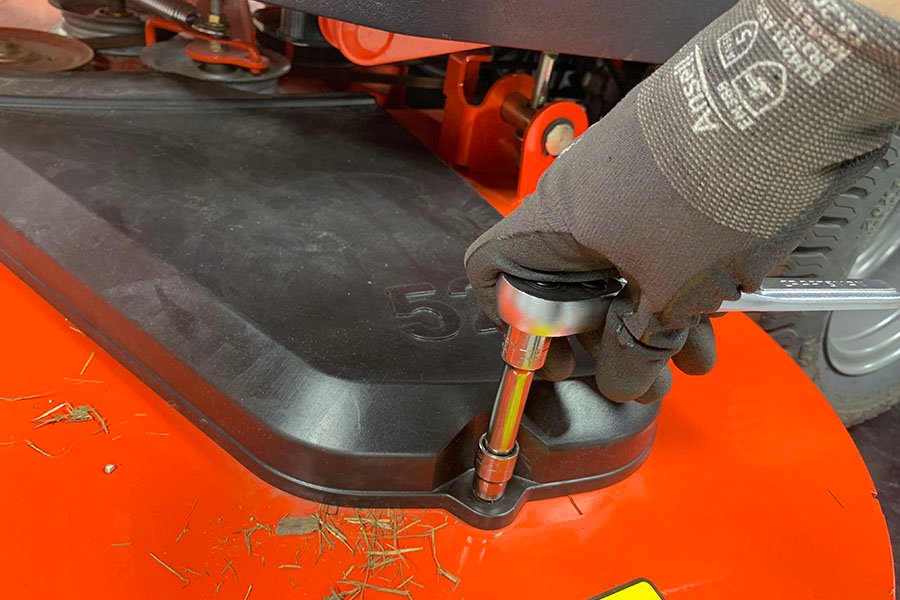
1. Remove the mower deck if needed
Some riding mowers let you change the belt with the deck still installed. Others are easier to service with the deck lowered or removed. If your machine has limited access under the chassis, removing the deck often makes the job cleaner and faster.
Lower the deck to its lowest position first. Remove the deck belt guards, retaining clips, or hanger pins as your model requires. Keep the hardware organized in a cup or tray so nothing disappears into the grass later.
2. Release belt tension carefully
Most belt systems use spring-loaded idler pulleys. That spring is what keeps the belt tight during mowing. You usually need to move the idler arm or belt keeper to create slack.
Use a wrench or ratchet on the tension arm, if your mower has one, and slowly move it against spring pressure. Do not force the belt off a pulley with a screwdriver unless the manual allows it. A slip can damage the pulley edge or pinch your hand.
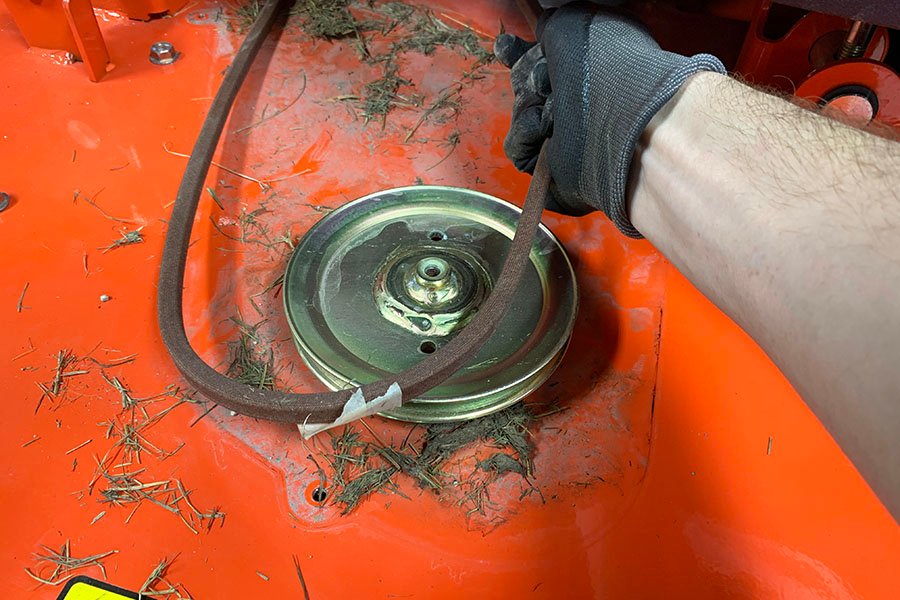
3. Remove the old belt
Once tension is released, slide the belt off the easiest pulley first. Work step by step, following the routing path in reverse. If the belt is broken, this may be simple. If it is still intact, do not yank it out without noting how it passed through guides and keepers.
Pay attention to pulley orientation. A flat idler pulley and a V-groove pulley do different jobs. The belt must sit correctly in the groove, or it will ride high, slip, and wear out quickly.
4. Compare the new belt with the old one
Before installing, compare the new belt to the old one on length, width, and tooth pattern if applicable. Even a difference of a few millimeters can cause poor tension or premature slip. A deck belt that is too short can overload the idler spring. A belt that is too long may not engage the blades properly.
This is a good moment to check for hidden problems. Spin each pulley by hand. A rough, noisy, or wobbly pulley should be replaced now, not after the new belt goes on.
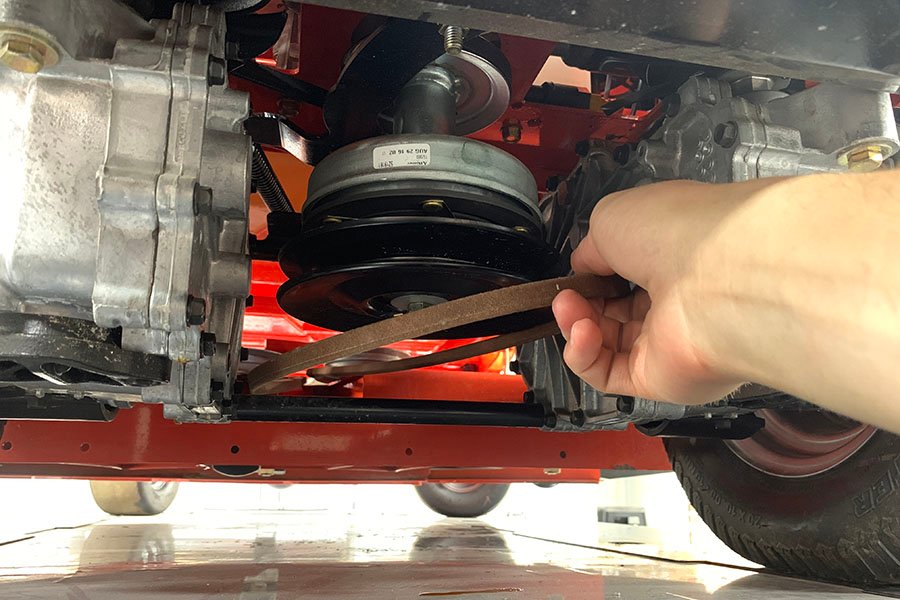
5. Route the new belt in the correct path
Follow the belt diagram exactly. If your mower’s decal is missing or unreadable, use the owner’s manual or a photo from before removal. Start with the engine pulley or transmission pulley, then work the belt around the idlers and spindle pulleys in the correct order.
Make sure the belt sits fully inside each groove. Twisted belt sections are a common mistake. The belt should lie flat on flat pulleys and in the groove on V-style pulleys. If it looks forced, stop and re-check the route.
| What to inspect | Good sign | Problem sign |
|---|---|---|
| Belt tension | Firm, with normal spring pull | Loose, fluttering, or too tight |
| Pulley condition | Spins smoothly and quietly | Wobble, noise, or rough spots |
| Belt seating | Fully in groove and straight | Riding high or twisted |
| Keeper clearance | Close enough to guide, not rub | Dragging on the belt |
6. Reapply tension and reinstall guards
Once the belt is routed, slowly return the tension arm to its original position. Watch the belt as the spring tightens. It should stay aligned and settle into the pulley grooves without jumping.
Reinstall every guard, cover, and belt keeper you removed. These parts matter more than many owners think. A missing guide can let the belt jump off during the first bump in thick grass.
7. Test the engagement before mowing
Before cutting grass, start the engine in a safe, open area. Engage the blades briefly and listen. A healthy belt system usually runs smoothly with only a steady mechanical sound. A squeal, slap, or repeated chirp means something is misaligned.
Shut the mower off and recheck belt tracking if you hear anything odd. It is much easier to fix now than after the belt has been shredded for five minutes in tall grass.
Common mistakes that cause the new belt to fail
Many people replace a mower belt, then have the same problem again within days. The belt was not always bad. The real issue was often installation or a worn part around it. Knowing the common mistakes helps you avoid paying for the same repair twice.
Credit: ariens.com
Using the wrong belt size
This is the biggest mistake. A belt that is close but not exact can run hot, slip under load, or ride out of the pulley groove. Belt numbers matter. Model and deck size matter too. Two mowers from the same brand can use very different belts.
If you are unsure, match the part number to the mower model and deck width. A 42-inch deck, for example, will not always use the same belt as another 42-inch deck from a different series.
Ignoring worn pulleys or idlers
A bad pulley can destroy a new belt fast. If the pulley bearing is rough, it creates heat and side load. That side load eats the belt edge, sometimes in less than one mowing season.
Look for wobble, rust, grinding noise, or a pulley that turns unevenly. Replacing a weak pulley now is often cheaper than replacing another belt later.
Routing the belt over the wrong side of a guide
Belt guides are easy to overlook because they look small. But they control the belt’s path during vibration and blade engagement. If the belt is outside a guide that should be inside the loop, it may throw off alignment the moment you hit thick grass.
Use your photos and manual here. This is where most first-time repairs go wrong.
Leaving grease, oil, or grass buildup on the pulleys
Contamination shortens belt life. Oil on a belt causes slip. Packed grass around the deck can interfere with cooling and add extra drag. Before installing the new belt, clean the pulley faces and remove heavy debris from the deck.
A stiff brush and rag are usually enough. Do not flood pulleys with lubricant unless the manufacturer specifically says to do so.
How to know the repair is done right
A correct belt replacement should feel predictable. The deck engages without a harsh jerk, the mower does not squeal under normal load, and the belt stays centered in the pulleys. If the belt wanders side to side, that is a warning sign.
Run the mower for a short test and inspect the belt again after a few minutes. Fresh belts sometimes settle slightly, but they should not be excessively hot, smoky, or loose. If you smell burning rubber, stop and check alignment immediately.
One detail many owners miss is deck leveling. A badly leveled deck can make the belt and spindles work harder on one side. That does not cause every belt issue, but it can shorten belt life and create uneven cutting performance.
Credit: ariens.com
When to stop and get help
If the belt keeps coming off after correct installation, the problem is probably beyond a simple belt swap. Common deeper causes include bent deck hangers, damaged spindle shafts, a seized blade, a failed tension spring, or a warped pulley bracket.
Also stop if you cannot access the belt safely or if the tension system uses heavy spring force that feels unstable. A repair shop can handle those cases faster and with less risk of injury.
As a practical rule, if you have replaced the belt correctly and it still slips in less than 10 minutes of mowing, the issue is likely not the belt itself.
Tips that make future belt changes easier
Taking a few extra minutes now can save a lot of time later. The best mower owners make the next repair easier while they are already in the machine.
- Take clear photos of the belt path before removal.
- Write the belt part number on the mower frame with a paint marker.
- Clean the deck before reassembly so grass does not pack around the pulleys.
- Check belt guides every time you change blades.
- Inspect the belt once a month during mowing season.
Another useful habit is to replace belts before they fail completely if they already show cracking or fraying. A snapped belt can leave you stranded mid-job, while a worn belt changed early gives you more control over the repair timing.
If your mower manual is available online, keep a copy saved on your phone. The belt routing diagram is often the most useful page in the whole manual.
Final thoughts on changing a riding mower belt
Learning how to change belt on riding mower is mostly about patience, routing accuracy, and basic safety. Once you know how to release tension, follow the pulley path, and check the related parts, the job becomes much less intimidating.
The biggest wins come from doing the small things right: use the exact belt size, inspect the pulleys, clean the deck, and test the machine before a full mowing session. That simple routine can add a lot of life to the repair and keep the mower cutting evenly.
For exact routing and maintenance intervals, the best source is still your mower’s official owner’s manual or manufacturer support page. That one document often answers the belt questions for your exact model.
Credit: ariens.com
FAQs
How often should a riding mower belt be replaced?
Many mower belts last one to three mowing seasons, but the real answer depends on use, deck load, and maintenance. If you mow thick grass, hit sticks often, or store the mower outdoors, the belt may wear out sooner. Replace it as soon as you see cracking, glazing, or frayed edges.
Can I change the belt without removing the mower deck?
On some models, yes. On others, the deck must be lowered or removed for enough access. If the belt path is tight and you cannot see the pulleys clearly, removing the deck usually makes the job easier and reduces mistakes.
Why does my new belt keep slipping off?
The most common causes are wrong routing, worn pulleys, damaged belt guides, or a weak tension spring. A bent spindle or loose deck bracket can also let the belt wander. If the belt comes off more than once, the problem is usually not the belt alone.
Should I replace both mower belts at the same time?
If both belts are old, cracked, or near the same service age, replacing them together can make sense. But if only one belt is worn and the other still looks healthy, there is no need to replace both just because one failed.
What if I do not have the belt diagram?
Look for a routing decal under the hood, on the deck, or near the pulley cover. If it is missing, use the mower’s model number to find the correct manual from the manufacturer. Never guess the route if the belt system uses multiple idlers or crossed paths.