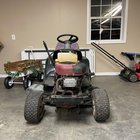
If you need to know how to remove front wheel from craftsman r1000 riding mower, the job is usually simple once you understand the wheel style and the fastener holding it in place. Most front wheels on this mower come off with basic hand tools, but a stuck hub, rust, or a missing retaining part can make the job harder than expected.
The good news is that you do not need special shop equipment for most cases. With the mower safely lifted, the steering turned for access, and the right removal method, you can usually take off the wheel in minutes and inspect the spindle, bushing, or tire for damage.
Below, you will find the exact steps, the tools that help most, the common mistakes that cause problems, and what to do if the wheel will not budge. The goal is to make the job clear, safe, and quick.
Quick steps to remove the Craftsman R1000 front wheel
Follow these steps in order before moving into the detailed instructions below.
- Park the mower on level ground, shut it off, remove the key, and set the parking brake.
- Lift the front end only high enough to take weight off the wheel and support it securely.
- Clean the hub so you can see whether the wheel uses a nut, washer, cap, or retaining clip.
- Remove the visible fastener and keep washers or spacers in the order they came off.
- Slide the wheel straight off the spindle, using penetrating oil and gentle rocking if it is stuck.
- Inspect the spindle, bushings, washers, and wheel hub before reinstalling or replacing the wheel.
What you need before starting
Before you remove the wheel, get the mower into a stable position. A front wheel comes off much more easily when the mower is on level ground, the engine is off, and the key is removed. If the mower has recently run, let it cool down first so you are not working around hot engine parts.
You do not need a large tool kit, but a few items make the process much easier. The exact hardware can vary by unit, so look closely at your wheel before forcing anything.
- Socket wrench or pliers for the retaining nut, if your mower uses one
- Flat screwdriver for dust caps or clips
- Rubber mallet for a stuck wheel
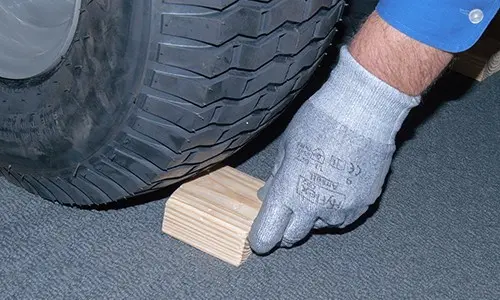
- Jack, ramp, or wood blocks to lift and support the mower safely
- Work gloves to protect your hands
- Penetrating oil for rusted parts
- Clean rag to wipe dirt from the hub and spindle
One helpful habit: take a quick photo of the wheel assembly before removing anything. That gives you a visual reference when reinstalling the wheel, especially if there are washers, spacers, or a small retaining clip. A missing spacer can cause wobble later, and many people do not notice it until the wheel feels loose again.
How to remove front wheel from Craftsman R1000 riding mower safely
The front wheel removal process is usually straightforward. On many riding mowers, the wheel is held on by a nut, a push-on cap, or a simple retaining clip. Start by identifying which style your Craftsman R1000 uses, because the correct method depends on that small detail.
1. Park and secure the mower
Turn the mower off and remove the key. Set the parking brake if your machine has one. This prevents the mower from rolling while you work.
Move the mower to a flat surface with good light. A level surface matters because you need the front end steady while lifting one side.
2. Lift the front end slightly
Raise the front of the mower just enough for the wheel to leave the ground. A small jack, mower lift, or sturdy wood blocks can work. Support the mower so it cannot drop while the wheel is off.
Do not rely on the jack alone. The front end should be supported by something solid before you put your hands near the wheel. If the mower shifts, the wheel can pinch your fingers or pull the machine toward you.
3. Clean the wheel hub area
Brush away grass, dirt, and packed debris around the hub. This makes the fastener easier to see and prevents dirt from falling into the spindle area during removal. It also helps you spot rust or damage.
If you see rust around the center hub, spray a small amount of penetrating oil and wait a few minutes. That short wait can save you from bending parts later.
4. Identify the wheel retention style
This is the step many beginners skip, and it causes the most mistakes. Some front wheels are held by a center nut, while others use a push-on cap, retaining clip, or a simple c-clip. Do not pull randomly until you know what is holding the wheel on.
If your wheel has a visible nut on the outer side, remove that first. If it has a plastic center cap, pry it off carefully with a flat screwdriver. If it uses a clip, remove the clip before trying to slide the wheel off.
5. Remove the fastener
Use the correct tool for the fastener. A nut should come off with a wrench or socket. A clip should be lifted out gently so it does not fly away. Keep all small parts in one place.
Many people lose spacers during this step. Place each washer, cap, or clip in the order you removed it. That makes reassembly much easier and prevents the wheel from sitting too far in or too far out.
6. Slide the wheel off the spindle
Once the fastener is removed, pull the wheel straight off the spindle. If it moves only partway and then sticks, wiggle it gently while pulling outward. A stuck wheel often needs a little patience, not more force.
If the wheel will not come off, tap the back of the tire lightly with a rubber mallet while pulling. Avoid hitting the rim hard with a metal hammer. That can crack plastic wheels or damage the bearing surface.
7. Inspect the axle area
After the wheel comes off, check the spindle, washer, bushing, and mounting surface. Look for grooves, bent metal, or heavy rust. A damaged spindle can cause wheel wobble, steering issues, or repeat wheel failure.
If the wheel was hard to remove because of rust, clean the spindle before putting the wheel back on. A small amount of grease on the contact point can help prevent future sticking, but do not overdo it. Too much grease attracts grass and dirt.
How to tell which front wheel setup your mower has
Not every Craftsman R1000 front wheel assembly is identical. That is why two people can describe the same mower differently. One may have a nut-secured wheel, while another sees a cap or clip-style setup. Knowing the difference saves time and keeps you from prying on the wrong part.
| Wheel setup | What it looks like | Removal method | Common issue |
|---|---|---|---|
| Nut-retained wheel | Visible nut on the outer hub | Remove nut, washer, then slide off wheel | Nut may be rusted or stripped |
| Cap-retained wheel | Plastic or metal center cap | Pry off cap, then remove hidden fastener | Cap can crack if forced |
| Clip-retained wheel | C-clip or push clip on the spindle | Remove clip with pliers or screwdriver | Clip may spring away during removal |
A wheel that looks “simple” from the outside may still hide a washer or spacer behind the hub. That is why it helps to remove parts slowly and keep them lined up in order. The order matters more than most people expect.

Credit: reddit.com
What to do if the wheel is stuck
A stuck wheel is usually caused by rust, dirt buildup, a bent washer, or corrosion between the wheel hub and the spindle. In most cases, the problem is not serious. It just needs a cleaner, gentler removal method.
Use penetrating oil first
Spray a small amount where the hub meets the spindle and wait 10 to 15 minutes. This gives the oil time to work into the rust. If the wheel is very stuck, a second application may help.
Rock the wheel, do not yank it
Grip the tire with both hands and rock it side to side while pulling straight outward. The goal is to break the rust bond without bending the spindle. Short, controlled movement works better than hard pulling.
Tap around the hub
Use a rubber mallet to tap around the wheel hub, not the end of the spindle. Light tapping can loosen stuck surfaces. If the wheel is plastic, use even less force.
Check for hidden hardware
If the wheel still will not move, stop and inspect it again. A small clip, cap lip, or recessed washer may still be holding it. This is a common reason people think the wheel is seized when it is actually still locked in place.
According to official mower safety guidance, working carefully around lawn equipment and using proper support is important to avoid injuries during maintenance. That is especially true when lifting or removing parts from a riding mower.
Common mistakes that make the job harder
Most wheel removal problems come from rushing. A few small mistakes can turn a five-minute task into a frustrating one. Knowing these in advance helps a lot.
- Forcing the wheel before checking the fastener — this can break the cap or bend the hub.
- Using a metal hammer on plastic parts — this may crack the wheel or distort the spindle area.
- Skipping the support step — an unstable mower can drop suddenly.
- Mixing up washers and spacers — this can cause wheel wobble during reassembly.
- Overtightening during reinstall — too much tightening can make the wheel bind or wear fast.
One non-obvious issue: dirt can hide the real fastener type. A wheel may look like it has no clip or nut because packed grass is covering it. Cleaning the hub first often solves the mystery before you start prying.
Another useful detail is that some front wheels feel “stuck” simply because the mower is not lifted high enough. If the tire still touches the ground even a little, the spindle can stay under side load. That pressure makes removal harder than it should be.
Credit: reddit.com
Reinstalling the wheel the right way
Once the wheel is off and inspected, reinstalling it correctly matters just as much as removal. A wheel that goes back on crooked can wear out fast or affect steering. The front end should roll smoothly with no grinding or side play.
Clean before installing
Wipe the spindle and the inside of the wheel hub with a rag. Remove old grease, rust flakes, and dirt. If the spindle has light rust, clean it before the wheel goes back on.
Replace worn parts if needed
If the washer is bent, the clip is weak, or the wheel hub is cracked, replace the part instead of reusing it. A worn washer may seem minor, but it can create extra play in the wheel and make steering feel loose.
Slide the wheel back into place
Push the wheel onto the spindle in the same order the parts came off. Add washers and clips in their original positions. Tighten the fastener enough to secure the wheel, but do not crush the wheel assembly.
Test the movement
Spin the wheel by hand. It should turn smoothly without scraping. Then wiggle it side to side gently. A small amount of play may be normal on some mower setups, but obvious looseness means something is missing or installed incorrectly.
After both sides are reassembled, lower the mower and roll it forward a few feet. Watch the wheel path. If it pulls, drags, or leans, stop and check the hardware again before mowing.
When the problem is bigger than wheel removal
Sometimes the wheel comes off fine, but the real issue is underneath it. If the spindle is bent, the bushing is worn, or the axle mount is cracked, the mower may still steer poorly after reassembly. In that case, removing the wheel was only the first step.
Look for these warning signs:
- The wheel wobbles even with the fastener tightened
- The tire leans inward or outward at an odd angle
- You hear grinding when the wheel turns
- The mower pulls hard to one side during use
- The spindle looks visibly bent or damaged
If you see those signs, the safest move is to stop and inspect the front axle assembly. A bent spindle can worsen quickly, and a damaged front end can make the mower hard to control. If you are not comfortable with deeper repairs, this is the point to get help from a small engine or mower repair professional.
For replacement parts or model-specific diagrams, your owner’s manual is the best source for the exact wheel hardware layout on your R1000. If you do not have the printed copy, check the manufacturer support page for your model information before ordering parts.
Final take on the removal process
Learning how to remove front wheel from craftsman r1000 riding mower is mostly about patience, good support, and checking the fastener before you pull. Once you identify whether the wheel uses a nut, cap, or clip, the job becomes much easier.
Take your time with the hub, keep the small parts in order, and inspect the spindle before reinstalling. That simple habit prevents most repeat problems and keeps the mower rolling straight. If the wheel is stuck, use penetrating oil and gentle tapping instead of brute force.
Done the right way, this is a quick maintenance task that can help you fix steering issues, replace a worn wheel, or inspect hidden damage before it gets worse.
Credit: searspartsdirect.com
FAQs
How do I know if my Craftsman R1000 front wheel has a nut or clip?
Look closely at the outside of the wheel hub. A visible hex nut usually means a nut-retained wheel. A small round cap or hidden clip means you need to remove that part first before the wheel slides off.
Can I remove the wheel without lifting the mower?
It is not recommended. Lifting the front end gives you room to work and removes pressure from the spindle. That makes the wheel easier to remove and helps prevent injury.
What if the wheel spins but will not come off?
The wheel may still be held by a washer, clip, or hidden fastener. Clean the hub carefully and inspect both sides before pulling harder. If it is rusted, use penetrating oil and try again after a short wait.
Should I grease the spindle before reinstalling the wheel?
Use only a light amount if needed. Too much grease collects dirt and grass, which can make the wheel harder to remove later. A thin film is usually enough to reduce sticking.
When should I replace the front wheel instead of reinstalling it?
Replace it if the hub is cracked, the tire is badly worn, or the wheel wobbles even after tightening. If the wheel bearing or bushing is damaged, replacing the part is usually the better choice.